Commercial real estate photography is the discipline of shooting income-producing property — office suites, retail strips, warehouses, industrial parks, multifamily buildings, and mixed-use developments — for marketing flyers, OM packets, LoopNet listings, and broker decks. It overlaps with residential work in obvious ways (you still need a tripod and a level horizon) but the buyers, the spaces, and the business requirements are different enough that residential techniques will leave money on the table.
A residential listing is sold on emotion. A commercial listing is sold on numbers and use case: clear-height in a warehouse, parking ratio at an office, frontage at a retail bay, in-place rents on a multifamily comp. Your photos have to support that. They need to read at small sizes in a CoStar tile, hold up in a 30-page printed offering memorandum, and survive being projected on a conference-room screen for an investment committee. That means wider lenses than residential, longer exposures to keep ISO clean under mixed industrial lighting, more exterior context, and — increasingly — drone shots for any property where the parcel itself matters more than the four walls on it.
This guide walks through what makes commercial real estate photography different, the gear that earns its keep, a room-by-room shoot list for each major property type, what the work pays in 2026, and where AI editing fits into a CRE workflow without breaking the trust of an institutional buyer.
What makes commercial real estate photography different from residential
The most useful way to think about it: residential buyers walk through a property emotionally, then justify with numbers. Commercial buyers walk through it numerically, then justify with feel. The photos have to lead with the numbers.
A few concrete differences that change how you shoot:
- The buyer is reading a spec sheet, not browsing. A CRE listing photo runs next to a clear-height number, a column-spacing measurement, a power spec, or a parking ratio. The photo’s job is to confirm the spec at a glance. Wide shots that show the whole bay, the column grid, and the ceiling height in one frame beat tight detail shots almost every time.
- Spaces are bigger and emptier. A 40,000 sq ft warehouse or a vacant first-generation office is mostly air. You need wider lenses (often 14–16mm full-frame equivalent) and you have to fight cavernous emptiness with composition — leading lines down dock-door rows, column grids drawn through the frame, polished concrete reflecting the lighting plan.
- Mixed lighting is the norm, not the exception. Sodium-vapor warehouse fixtures next to LED office tubes next to daylight from a clerestory. Your white balance is going to fight you. Bracketed exposures and selective color correction matter more than they do in a sunlit living room.
- Exteriors carry more weight. In residential, the hero shot is often a kitchen or living room. In CRE, the hero shot is usually the building exterior or an aerial — because the parcel, the access, the visibility from the road, and the surrounding tenant mix are what an investor is buying.
- There are people you have to work around. Most commercial properties are occupied during the shoot. That means scheduling around tenants, hiding desktops and confidential paperwork in office shots, and getting written sign-offs that you can use the images even when employees are visible.
- Compliance and confidentiality matter. Some tenants — law firms, medical, government — don’t allow photography of their interiors at all. Some landlords require you to obscure tenant signage. Always confirm the shoot brief with the listing broker before you arrive, and never publish what wasn’t approved.
The output also looks different. A residential gallery is 25–40 images optimized for MLS. A commercial deliverable is a tiered package: 8–12 hero images for the listing, 30–60 supporting images for the OM, often a separate set of stitched panoramas for virtual tours, plus drone stills and video for any property over a few acres. You’re producing assets for a marketing system, not a single online listing.
Equipment for commercial real estate photography
You can shoot residential with a kit zoom and a phone-controlled flash. Commercial real estate photography asks for more, mainly because the spaces are larger and the lighting conditions less forgiving.
Camera body
A full-frame mirrorless body with strong dynamic range (14+ stops) is the working standard in 2026. Sony A7R V, Canon R5 Mark II, and Nikon Z8 are all overkill on resolution but the dynamic range is what matters when you’re bracketing for an office shot with windows on three walls. APS-C works for smaller properties but you’ll feel the crop the first time you try to fit a 60-foot retail bay into one frame.
If you’re starting with what you have, prioritize the lens before upgrading the body — a $400 wide on a $1,500 body beats a $600 kit zoom on a $4,000 body every time.
Lenses
You need wide, and you need a tilt-shift if you want to stop fixing perspective in post.
- Ultra-wide zoom (14–24mm or 16–35mm full-frame). This is the workhorse. Most interior commercial shots happen between 16mm and 20mm. Anything wider gets distorted; anything narrower can’t fit the room.
- Tilt-shift (17mm or 24mm). Optional but career-defining if you shoot a lot of office and retail. A tilt-shift lens keeps vertical lines vertical without crop-and-skew in post, which preserves resolution and keeps the file usable for print marketing.
- Standard zoom (24–70mm). For detail shots, signage, lobby art, and exterior medium shots where the ultra-wide would distort.
- Telephoto (70–200mm). For exterior compression — pulling a building tight against its skyline backdrop, isolating signage, shooting from across a parking lot when you can’t get closer.
Tripod and head
Non-negotiable. You’ll be shooting bracketed exposures of 3–7 frames at apertures around f/8–f/11 with shutter speeds well below handheld. A heavy carbon-fiber tripod (Gitzo Series 3, Really Right Stuff TVC-33, Manfrotto 055CXPRO4) and a leveling base or geared head make a real difference for commercial work where horizons must be perfectly level and verticals perfectly plumb.
A leveling base is worth its weight. The first time you shoot a 200-foot warehouse exterior on uneven asphalt and the bubble level locks in 30 seconds instead of 5 minutes, you’ll never go back.
Lighting
Two schools here: ambient-only (bracket and blend) or supplemental flash. Most working CRE photographers carry both because you can’t predict what you’ll walk into.
- Speedlights with radio triggers. Two or three Godox AD200s or Profoto A10s cover 90% of interior work. You bounce them off walls and ceilings to lift shadows in a dim warehouse corner or to balance a backlit office.
- Continuous LED panels. Useful for video, useful for showing the broker what the shot will look like before you commit. Aputure, Nanlite, and Godox all make portable LED panels that run on V-mount batteries.
You don’t need a full studio kit. You need enough light to lift the darkest part of the frame to within five stops of the brightest, so your bracket-and-blend doesn’t fall apart.
Drone
If you’re shooting industrial, multifamily, or anything with a parcel larger than two acres, a drone isn’t optional. The full Part 107 rules and gear breakdown live in our aerial photography for real estate guide, but the short version for CRE: a DJI Mavic 3 Pro or Air 3 with a 1-inch sensor is the working minimum. For larger industrial sites or any shoot involving construction progress documentation, the Mavic 3 Enterprise with the RTK module gives you the precision you’ll want.
Drone shots in CRE serve four purposes: showing the parcel boundary, showing access (highway proximity, rail spurs, dock orientation), showing surrounding tenant mix, and showing parking and yard area. Each of those is a different shot — don’t think you can cover all four with one orbit.
360° camera
For office and multifamily, virtual tours have become standard. A Matterport Pro3, Insta360 X4, or Ricoh Theta Z1 covers most needs. The Matterport ecosystem is heavier and more expensive but produces dollhouse views that institutional buyers expect for office and multifamily marketing. Insta360 and Ricoh are lighter and cheaper, fine for retail and smaller industrial.
Color management
A ColorChecker Passport in your kit, used at the start of every shoot, will save you hours in post when you’re white-balancing five different light sources in one OM packet. Cheap, foolproof, and it makes the difference between a portfolio that looks consistent and one that looks like five photographers shot it.
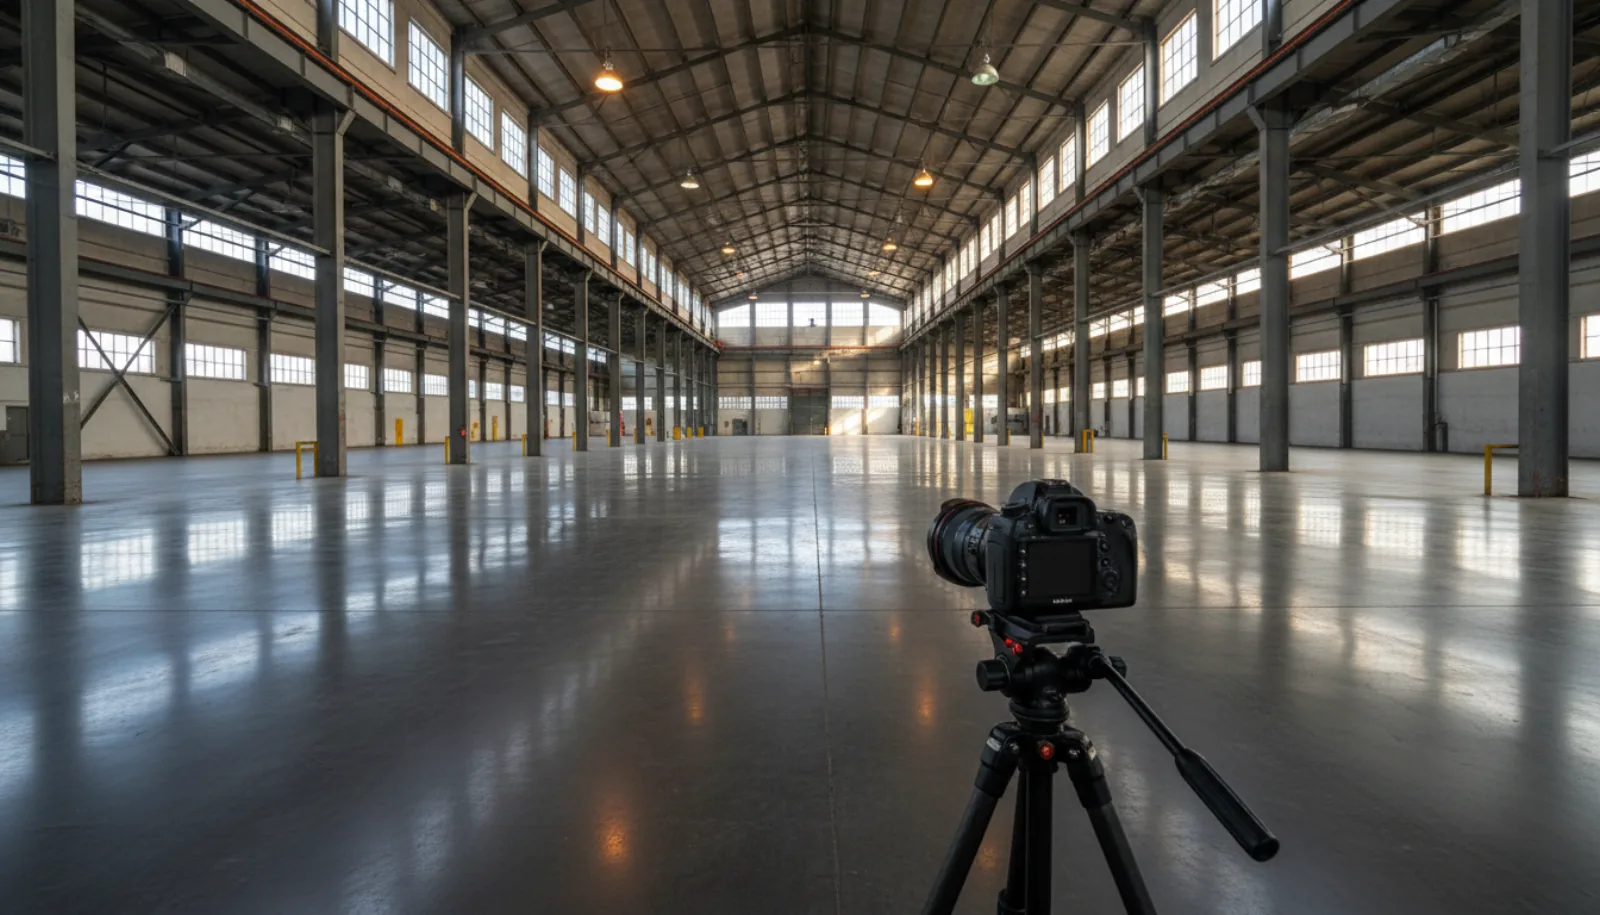
This is roughly what the kit looks like deployed inside a vacant industrial space — wide-angle on a sturdy tripod, mixed natural and bay lighting, plenty of dead floor to compose into:
Shooting commercial spaces room by room
Each property type has its own shoot list. Working from a checklist keeps you from leaving a site at 6pm and realizing you missed the loading dock — a mistake you only make once.
Office
Office buildings are usually shot in three layers: the building, the floors, the spec suites.
Exterior. Lead with a hero shot from the corner that shows the entrance, signage, and immediate parking. Then a context shot showing the building in its market — adjacent properties, transit access, freeway visibility. Then signage details and any tenant-facing amenities (rideshare drop-off, EV chargers, plaza).
Common areas. Lobby (hero shot from the entry, second shot from the elevator bank looking back), elevator interiors if recently renovated, restrooms (yes, really — Class A buyers care), conference centers, fitness centers, and any tenant lounge or café. Common-area photos are what justifies the “Class A” label in marketing.
Floor plates. Empty floor plates need to read as flexible. Shoot from corner to corner showing the column grid and window line. If the floor is partially built out, shoot the open part in a way that suggests space-planning options. A small floor plan diagram printed and placed in-frame can help orient the viewer.
Spec suites. These are pre-built turn-key suites brokers can lease quickly. Photograph them as you would a residential listing, but emphasize the corner offices, the conference room glass, and the kitchen/break area. Replace branded coffee mugs and confidential whiteboards.
Retail
Retail is about frontage, signage, and traffic.
Streetscape. Wide shot showing the storefront in context with adjacent retailers. Pedestrian traffic in the frame helps; wait for it if you can. Frontage. Tight on the storefront showing the building’s signage band, awning, and entry. Make the available square footage obvious. Interior bay. From the front entry looking back to the rear, then from the rear looking forward. If the bay is in vanilla-shell condition, that’s actually marketable — show the open ceiling, polished floor, and HVAC trunk lines clearly. Co-tenancy. A pull-back shot that shows the anchor tenant and the available bay together. Investors lease retail based on co-tenancy more than any other factor. Parking and access. Especially curb cuts, drive-thru lanes if applicable, and rear-access loading.
Warehouse and industrial
The most spec-driven property type. Photos here are confirming numbers, not selling beauty.
Exterior. Drone hero showing the building footprint, dock orientation, truck court depth, and trailer parking. Ground-level shot from the truck court showing dock door count and clear-height. Building corner shot showing the office entry separately from the dock entry. Dock area. Wide shot down the row of dock doors with one open to show the leveler, bumpers, and seal. If the property has rail service, the rail spur gets its own hero shot. Warehouse interior. Wide shot down the longest axis showing column spacing, clear-height, and lighting. Include a ladder, forklift, or pallet for scale — without scale a 36-foot clear warehouse looks identical to a 22-foot clear warehouse in a photo. Office build-out. Industrial buildings usually have a small office component (5–15% of the GLA). Shoot it like a small office: lobby, conference, open work area, kitchen. Yard. If the property has a yard (laydown area, container storage), it gets a drone shot showing fenced perimeter, gate access, and surface (paved vs gravel matters to industrial users).
Multifamily
Multifamily marketing is closer to residential in feel but operates on commercial underwriting. The OM is going to a buyer pricing the deal off in-place rents.
Exterior. Building elevations from at least two angles. Drone shot showing the full site plan, parking, pool, and amenity area. Entry signage with monument or marquee. Amenities. Pool and deck (always shot in golden hour with lounge furniture staged), fitness center, club room, leasing office, mail room, dog park, EV stations. These are the photos that go on the OM cover. Unit interiors. A model unit per floor plan. Shoot like residential — wide angles, blended exposures, twilight if the views are a selling point. Avoid showing personal effects in occupied units. Common corridors and laundry. Often skipped, often necessary. Buyers want to see condition.
Mixed-use
Mixed-use shoots are essentially three shoots stacked: the retail ground floor, the office or residential above, and the integration between them (lobby flow, elevator share, parking allocation). Block the day in three time windows — exterior at golden hour, retail mid-morning when stores open, residential or office mid-afternoon when occupancy is lowest.
The hero shot for mixed-use almost always lives in the air. A drone shot showing how the building integrates with the street wall, the surrounding density, and any pedestrian plaza is what differentiates a mixed-use marketing package from a stack of single-use shots.
For a working photographer’s full walkthrough of how a CRE shoot is actually run end-to-end — from prep call to delivered package — Nathan Cool’s tour of the discipline is one of the most useful single videos out there:
Commercial real estate photography pricing and rates
Pricing for commercial real estate photography in the US runs roughly $300 on the small end (a single-tenant retail bay, 30 minutes on site, light editing) up to $2,000+ for a full Class A office tower or institutional multifamily package. The variables that move the number:
- Square footage. Most CRE photographers price in tiers — under 5,000 sq ft, 5,000–25,000 sq ft, 25,000–100,000 sq ft, 100,000+ sq ft.
- Image count delivered. A standard package is usually 15–25 images. OM packages run 40–80.
- Drone. Adds $200–500 depending on flight time and complexity.
- Twilight shoot. Adds $150–400 because it’s a separate trip and a tight shooting window.
- Virtual tour / Matterport. Often quoted separately at $0.05–$0.10 per sq ft.
- Editing turnaround. Standard is 48–72 hours. Rush (24 hours) is +25–50%.
- Usage rights. Most CRE photographers license images to the listing brokerage for the duration of the listing. Owners and developers who want unlimited usage in perpetuity usually pay 1.5–2x.
A working benchmark in 2026 looks something like this:
| Property type | Typical fee | Includes |
|---|---|---|
| Single retail bay (under 5,000 sq ft) | $300–500 | 15 images, ground-level only |
| Office floor or spec suite | $500–900 | 20–30 images, exterior + interior |
| Industrial (25,000–100,000 sq ft) | $700–1,200 | 25 images + drone exterior |
| Multifamily (50–150 units) | $1,200–2,000 | Full amenity + model unit + drone |
| Class A office building | $1,500–3,000+ | Full OM package, drone, twilight |
Photographers in major markets (NYC, SF, LA, Chicago, Boston) tend to price 20–40% above these benchmarks. Tertiary markets often run below.
If you’re a broker hiring for a shoot, the most common mistake is under-scoping the deliverable. A $400 shoot that comes back with 12 images is fine for a leasing flyer; it’s not fine for an OM going to institutional capital. Match the spend to the audience.
If you’re a photographer pricing your own work, the largest single lever on profitability is editing turnaround. The faster you can deliver finished images, the more shoots you can book per month — which is where AI editing has actually changed the economics of the business.
AI editing for commercial real estate photos
Editing is where commercial real estate photography becomes a margin business. A traditional retoucher might spend 10–20 minutes per hero image fixing exposures, removing clutter, replacing skies, and correcting perspective. Across a 30-image OM, that’s a full day of post-production. AI tools have collapsed a lot of that work into seconds without changing the final aesthetic, as long as you’re disciplined about what you let the AI touch.
A few specific places AI editing earns its keep on a CRE shoot:
Lighting cleanup. Mixed-source lighting is the single biggest editing headache in commercial work. A single warehouse interior might have sodium-vapor highbays, daylight from clerestories, and LED office tubes spilling in from the office build-out. Manually balancing those in Lightroom is slow. BrightShot’s lighting enhancement cleans up exposure and color across the frame in a single pass while preserving the architectural detail that an institutional buyer is going to scrutinize.
Decluttering. Office shots almost always need clutter removed — desk stacks, personal items, branded mugs, paperwork. Same with retail (price tags, posters, registers). Manually cloning those out is tedious. AI photo declutter handles the obvious cases in seconds. Use it for desktops, breakroom counters, and anywhere personal effects creep in. Don’t use it to remove load-bearing visual cues like exit signs or fire-suppression infrastructure — those are part of the building spec and a buyer will notice.
Sky replacement on exteriors. Commercial exteriors live and die on the sky. A hero shot of a Class A office tower under flat overcast lighting reads as cheap; the same shot with a clean blue sky and well-defined clouds reads as institutional. Sky replacement is one of the highest-ROI edits in CRE. Keep it tasteful — overdone golden-hour skies on a Tuesday-morning warehouse shoot fool nobody.
Perspective correction. If you didn’t shoot with a tilt-shift, perspective view swap corrects converging verticals after the fact. This matters most on building exteriors, where leaning verticals make the structure look like it’s about to fall over. A proper perspective correction makes the building read as solid, level, and well-engineered — which is exactly the impression an investor is buying.
Twilight conversion. Day-to-dusk on a single building exterior used to mean a separate trip at golden hour. AI day-to-dusk conversion can bridge the gap when scheduling makes a real twilight shoot impossible — though for premium institutional work, a real twilight shoot still wins.
What AI editing should not do in commercial work: it shouldn’t fabricate amenities that don’t exist, change finish materials, or add square footage. CRE buyers are sophisticated and have inspection rights; misrepresenting the physical asset in marketing is a fast way to end a brokerage’s reputation. Use AI to clean up what’s there — not to invent what isn’t.
For a deeper walkthrough of the same toolkit applied to residential and mixed CRE workflows, the AI real estate photo editing guide covers the underlying principles.
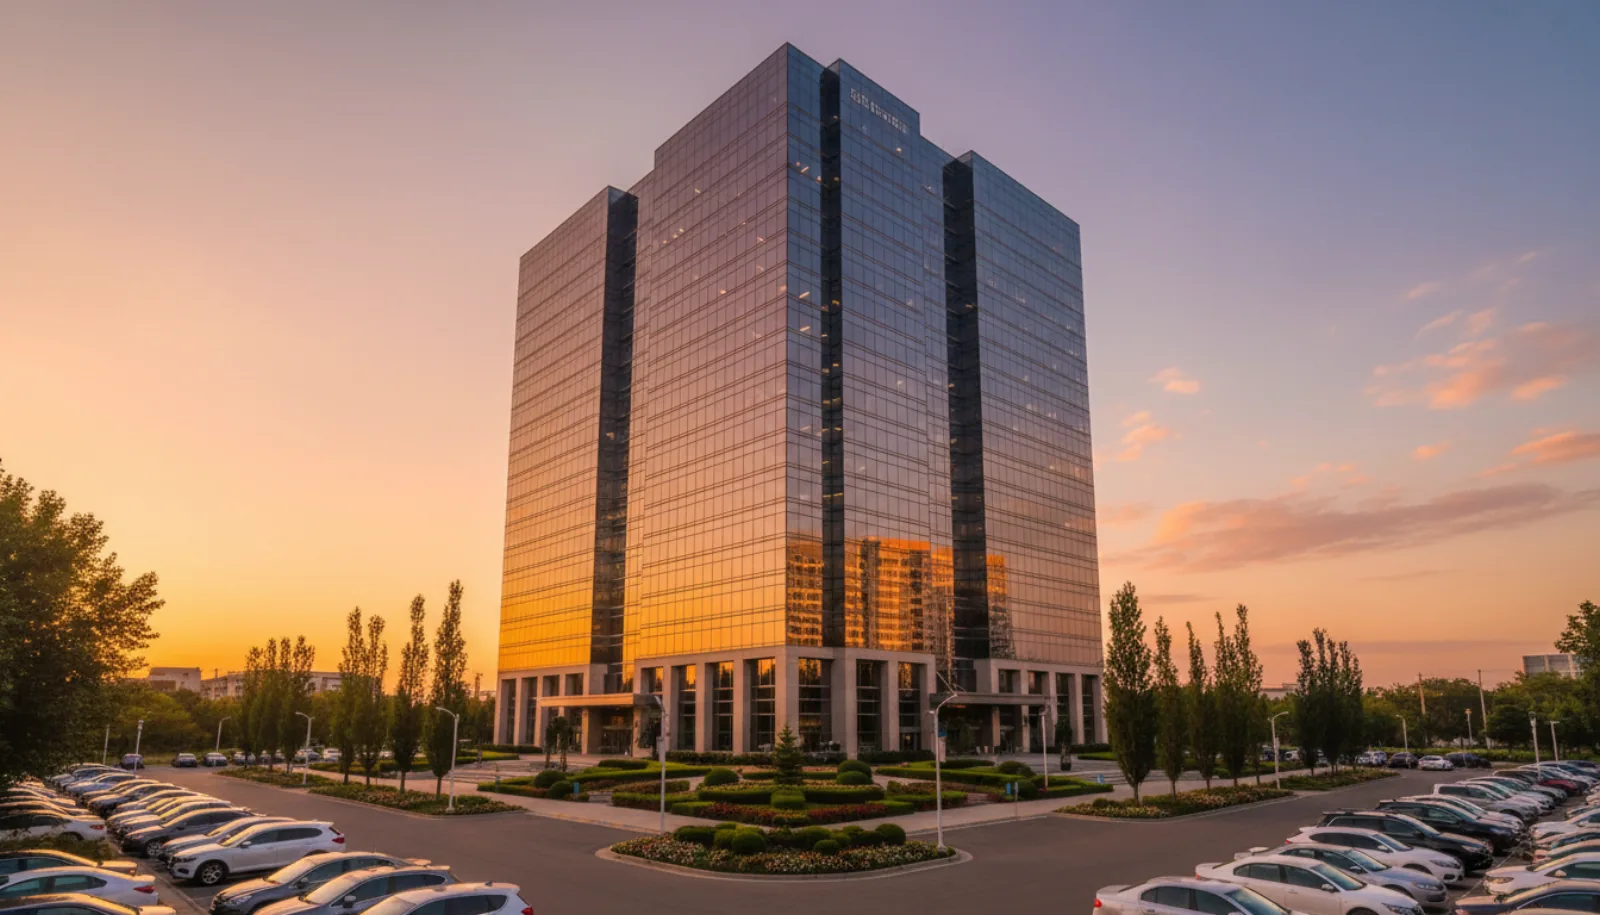
The hero shot most CRE marketing packages lead with is the building exterior at golden hour — clean glass, level horizon, and a sky that reads institutional rather than flat:
For a deeper technical breakdown of working in cavernous industrial spaces — the lighting decisions, the lens choices, and the framing principles that hold large interiors together — Steven Brooke’s session on industrial photography fundamentals is worth the watch:
Marketing commercial listings with photography
Photography is the input. The marketing system is what turns those images into leases and sales. A few patterns that consistently move the needle on commercial listings in 2026:
Tier the gallery. Don’t dump 60 images on the front of a listing. Lead with 6–8 hero shots — exterior, drone, hero interior, amenity, signage. Put the depth in the OM PDF where serious buyers will find it. CoStar and LoopNet algorithms reward listings with consistent click-through; a gallery that’s too long dilutes that.
Use video for properties over $10M. A 60–90 second cinematic walkthrough video, set to a neutral score, is now table stakes for institutional listings. Drone-to-interior reveal shots are particularly effective on large industrial and multifamily. The companion piece on drone video for real estate covers the production side.
Match photography to the buyer. A retail strip pitched to a private investor looks different than the same strip pitched to a REIT. Private investors respond to high-contrast, vibrant images that look like the property is busy and successful. Institutional buyers respond to clean, neutral, almost architectural photography that emphasizes condition and spec. Brief the photographer accordingly.
Refresh seasonally. A commercial listing that sits for 9 months with the same exterior shot taken in November snowfall starts to feel stale. Re-shoot the exterior in spring and rotate the lead image. Algorithms read activity; your buyers do too.
Build a floor-plan-and-photo system, not a photo-only system. Every photo in an OM should be matched to a labeled point on the floor plan. Buyers are constantly toggling between “what does this room look like” and “where is it in the building.” Make that easy. Tools like Matterport bake this in; if you’re working from stills, a numbered floor plan in the OM does the same job.
For the broader marketing system that wraps around CRE photography — listing setup, distribution, broker email outreach, social — the real estate marketing guide for agents walks through the full stack. Most of those frameworks transfer directly to commercial work; the channel mix shifts (more direct broker outreach, less Zillow), but the role of photography as the asset that everything else hangs on is the same.
FAQ
What is commercial real estate photography? Commercial real estate photography is the specialized practice of photographing income-producing property — office, retail, industrial, multifamily, and mixed-use — for marketing materials including listing flyers, offering memoranda, broker websites, and platforms like CoStar and LoopNet. It differs from residential real estate photography in subject matter, output format (often delivered as a tiered package for both online listings and print OMs), and shooting requirements (wider lenses, more exterior work, frequent drone integration).
How much does commercial real estate photography cost? Most commercial real estate photography in the US runs $300–$2,000+ per shoot in 2026. Single retail bays start around $300–$500, office and industrial properties typically run $700–$1,200, and full institutional packages with drone, twilight, and OM-ready deliverables can exceed $2,000. Pricing scales with square footage, image count, drone use, twilight shoots, and licensing terms.
What lens should I use for commercial real estate photography? For interior commercial work, an ultra-wide zoom in the 14–24mm or 16–35mm range (full-frame) is the workhorse. Most shots are taken between 16mm and 20mm. A 24mm or 17mm tilt-shift is worth the investment if you shoot a lot of office and retail, since it eliminates perspective correction in post and preserves resolution. A 70–200mm telephoto handles exterior compression shots and signage.
Do I need a drone license for commercial real estate photography? Yes. In the US, any commercial drone work — including real estate photography you’re being paid for — requires an FAA Part 107 Remote Pilot Certificate. The test costs around $175 and the certification is valid for 24 months with a free recurrent online course. The same rules apply whether you’re shooting a single retail bay or a 50-acre industrial park.
How long does a typical commercial real estate photography shoot take? A small retail bay or single office suite is 30–60 minutes on site. A mid-size office building or industrial property is 2–4 hours. A full institutional multifamily or Class A office package, including drone and twilight, is a half day to a full day on site. Editing turnaround is typically 48–72 hours for standard packages, or 24 hours for rush jobs at a 25–50% premium.
Can I use AI editing on commercial real estate photos? Yes, and most working CRE photographers do — for lighting cleanup, decluttering, sky replacement, and perspective correction. The rule of thumb is that AI editing should clean up what’s already in the frame (exposure, color, mess, dull skies) but should not fabricate features that don’t exist (amenities, finishes, square footage). Commercial buyers have inspection rights and will catch misrepresentation; AI is a finishing tool, not a misdirection tool.
What’s the difference between residential and commercial real estate photography? Residential photography sells emotion to a consumer browsing online; commercial real estate photography supports a numbers-driven decision by a sophisticated buyer reading a spec sheet. Commercial work uses wider lenses, more bracketed exposures (mixed lighting is constant in office and industrial), more exterior and drone coverage (the parcel matters as much as the building), and produces tiered deliverables for both online listings and printed offering memoranda. Residential galleries average 25–40 images; commercial OM packages can run 60+.