
Real estate HDR photography combines several exposures of the same scene at different brightness levels into a single image where windows, walls, and shadows are all readable. It exists to solve one specific failure: a single-exposure shot of an interior either blows out the windows to white or buries the floor in black. HDR photography for real estate listings fixes that by bracketing -2/0/+2 EV (or wider), then merging the frames so the listing shows both the view outside and the room inside.
Search the term “HDR photography real estate” or “real estate photography HDR” and you’ll get the same answer from every working photographer: bracket on a tripod, merge in software, tone-map subtly, ship the JPEG. The hard parts are the bracket settings (different per room) and the post-processing restraint that keeps the photo from looking like a video game.
This guide covers the bracketing settings you should use room by room, the five mistakes that wreck most HDR sets, how HDR compares to flash and ambient workflows, and where AI lighting tools can replace bracketing entirely.
Why HDR Photography Is Used in Real Estate
A camera sensor captures roughly 10-14 stops of dynamic range. A sunlit window next to a north-facing interior wall can span 16-18 stops. The math doesn’t work in a single exposure. Your eyes adapt because the iris and brain fuse multiple exposures in real time; the camera cannot.
Real estate HDR photography solves this by capturing the scene three to seven times at different shutter speeds, then merging the frames so the brightest and darkest areas both retain detail. The output is one photo where the lawn outside the window, the picture frames on the wall, and the inside of the cabinet are all visible.
The point of HDR real estate photography is to compress a 16-stop scene into an 8-bit JPEG without losing the window view or the shadow detail. Done right, the photo looks like the room felt — not like a stitched composite.
What a Bracket Looks Like
A “bracket” is a sequence of frames of the exact same composition at different exposures. A typical 3-shot bracket:
- -2 EV (underexposed): captures the window view, the sky, and any direct light source.
- 0 EV (metered): captures the mid-tones — walls, furniture, mid-distance.
- +2 EV (overexposed): captures the floor, dark corners, and inside cabinets or closets.
After the shoot, the frames are merged in software (Lightroom, Photomatix, Aurora HDR) which selects the best-exposed pixels from each frame and writes a 32-bit composite. Tone mapping then compresses that composite back into a viewable JPEG.
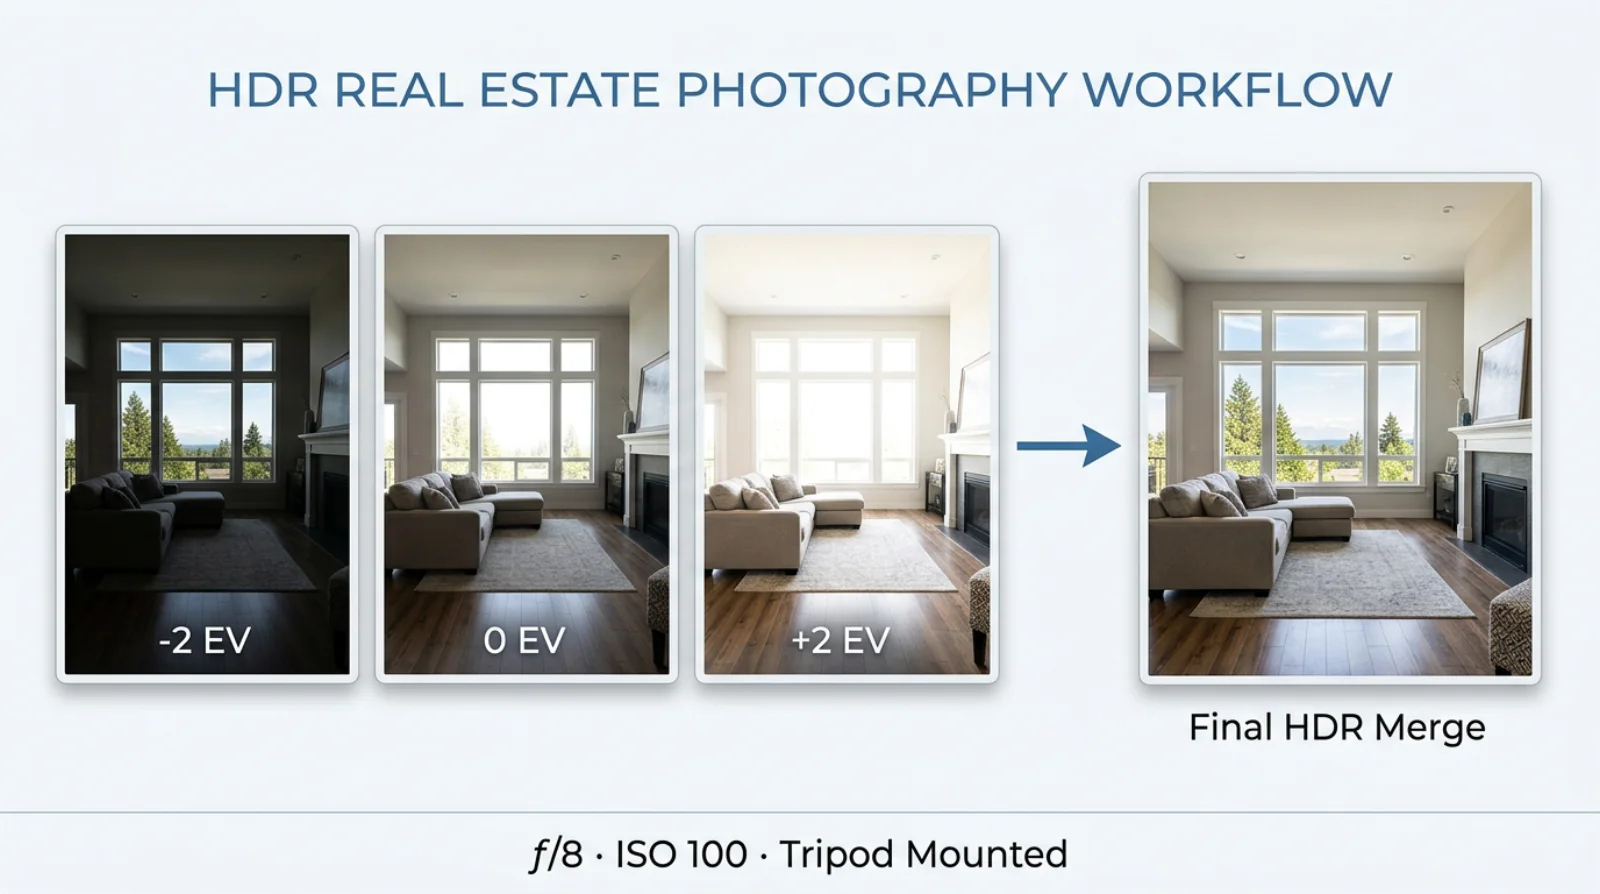
The diagram above is the entire workflow on one frame: three exposures captured on a tripod at the same composition, then merged in software into a single image where the window view, the wall texture, and the shadow detail all coexist. The merge step is software-side — the work in the field is just making sure the brackets are tripod-locked and the aperture/ISO don’t shift between frames.
Video walkthrough: the full HDR editing workflow
If you want to watch someone work through a real bracket-and-merge end to end before you try it on your own files, this 14-minute walkthrough from a working real estate photographer is the most useful one we’ve found:
HDR vs Standard Photography At a Glance
| Feature | Standard Single-Shot | HDR Photography |
|---|---|---|
| Window views | Blown to white, no exterior detail. | Sky and exterior visible, color preserved. |
| Shadows & corners | Crushed to black, no texture. | Open shadows with visible material detail. |
| Color accuracy | Skewed by the metering choice. | Balanced across the full tonal range. |
| Dynamic range | 10-14 stops (camera limit). | 16-20 stops (merged from brackets). |
| Buyer impression | Looks like a phone snapshot. | Looks like a listing photo. |
The Numbers Behind HDR Listings
HDR isn’t an aesthetic preference; it correlates with measurable listing performance. Properties marketed with HDR photos pull 118% more online views and tend to sell 50% faster than listings using single-exposure shots — see the breakdown of HDR vs standard real estate photos from HomeJab. Higher perceived value also tends to support higher list prices, which is why most agents charging $200+ per shoot include HDR by default.
The U.S. HDR real estate photography market was valued at $1.2 billion in 2022. Listings with professional photos sell for $934 to $116,076 more depending on price tier, generate 61% more online views, and make rooms feel 33% larger in the buyer’s perception — figures consolidated in Photoup’s real estate photography statistics. The demand for HDR-style output is what created the AI lighting category in the first place.
Bracketing Settings by Room Type
The “right” bracket isn’t fixed — it depends on the dynamic range of the room. A bathroom with frosted windows and even tungsten light is a 3-shot scene. A south-facing kitchen at noon with a wall of glass is a 5- or 7-shot scene.
Use these as starting points for real estate photography HDR work, then chimp the histogram and adjust if the brightest frame still clips highlights or the darkest frame still buries shadows.
| Room type | EV brackets | Aperture | ISO | Shutter (0 EV baseline) | Notes |
|---|---|---|---|---|---|
| Kitchen | -2 / 0 / +2 (3-shot) | f/8 | 100 | 1/30 s | Point away from windows when possible; mind reflective surfaces. |
| Living room | -3 / -1 / +1 / +3 (5-shot) | f/9 | 100 | 1/15 s | Largest dynamic range in most homes — wide windows + dark sofa. |
| Bathroom | -1 / 0 / +1 (3-shot) | f/8 | 200 | 1/8 s | Tight space; mirrors duplicate the bracket count visually. |
| Bedroom | -2 / 0 / +2 (3-shot) | f/8 | 100 | 1/20 s | Window with curtains usually controls the dynamic range. |
| Exterior | -2 / 0 / +2 (3-shot) | f/11 | 100 | 1/250 s | Bracket for sky highlights; shoot during golden hour if possible. |
| Twilight ext. | -3 / -1 / +1 / +3 (5-shot) | f/8 | 200 | 1/4 s to 2 s | Tripod mandatory; target 15-20 min after sunset. |
| Open plan | -3 / -1 / +1 / +3 (5-shot) | f/9 | 100 | 1/15 s | Multiple light zones — kitchen tungsten + living daylight. |
| Hallway | -2 / 0 / +2 (3-shot) | f/8 | 200 | 1/15 s | Often the darkest interior; raise ISO before opening aperture. |
Two rules across all of these:
- Shoot in Aperture Priority (A/Av) so only the shutter changes between frames. Aperture and ISO must stay constant across the bracket — if depth of field shifts between shots, the merge produces soft edges.
- Shoot RAW, never JPEG. RAW retains the bit-depth needed for tone mapping. JPEG bracketing produces banding in skies and posterized shadows.
For a wider gear and exposure setup walkthrough, our guide on the best camera for real estate photography covers body and lens choices that pair with these settings.
Sample Bracket Read-Outs
What the histogram should look like at each frame in a properly exposed bracket:
| Frame | Histogram shape | What you’re protecting |
|---|---|---|
| -2 EV | Right-shifted, no clipping on highlights, left side empty. | Window detail, sky, light fixtures. |
| 0 EV | Centered, mid-tones in the middle third of the histogram. | Walls, furniture, mid-distance objects. |
| +2 EV | Left-shifted, no clipping on shadows, right side may clip. | Floor, dark corners, inside cabinets. |
If the -2 EV frame still shows blinking highlights on the LCD review, the bracket is too narrow — widen to -3 or -4. If the +2 EV frame buries the shadows, widen to +3 or +4. The merge software needs both ends to bookend the scene’s full range.
Lens Choices for HDR Interiors
Three focal lengths cover 95% of real estate work:
- 16-24 mm wide-angle (full-frame) / 10-18 mm (APS-C): the workhorse for interiors. Wide enough to capture full rooms from a corner, narrow enough to keep distortion manageable below 18 mm. Avoid going wider than 16 mm full-frame unless you want fishbowl distortion on the walls.
- 24-70 mm zoom: for detail shots — kitchen islands, fireplace, master bath features. Use the 50 mm end for the most natural perspective.
- 70-200 mm telephoto: exterior detail, architectural features, reflection-free window shots from across the street. Rarely used inside but indispensable for exterior listing covers.
Tilt-shift lenses (24 mm and 17 mm in particular) eliminate vertical distortion at the optical level, but at $2,000+ they’re a luxury investment. The Transform panel in Lightroom handles 90% of vertical correction needs for free.
On-Site Workflow
Great HDR images are made on the tripod, not in Lightroom. The post-processing stage can rescue tone, but it can’t realign a 5-shot bracket where the camera shifted between frames.
Tripod Setup
A non-negotiable. Carbon fiber or aluminum, both work — the requirement is rigidity, not material. Set the legs short rather than tall when possible (lower center of gravity = less micro-vibration). Lock the head, then lock the legs, then add weight to the center column hook if the floor is uneven.
Camera height: 5 feet (1.5 m) is the industry default. Eye-level for most adults. Going lower exaggerates ceiling height and can look unnatural on listing thumbnails; going higher flattens the room and shows too much floor.
Camera Settings (Locked Across the Bracket)
Once the tripod is locked down, dial these in and don’t touch them between shots:
- Mode: Aperture Priority (A on Nikon/Sony, Av on Canon).
- Aperture: f/8 to f/11 for interiors. f/11 to f/16 for exteriors with a foreground.
- ISO: Native low (usually 100). Raise only if shutter speed at the brightest frame is faster than 1/4000 s and you’re losing the dark frame to clipping.
- White balance: Manual. Set to the dominant light source — Tungsten (3200 K) for incandescent, Daylight (5500 K) for window-lit rooms, Fluorescent (4000 K) for office or commercial. Auto WB shifts color temp between frames and ruins the merge.
- File format: RAW. Always.
- Drive mode: Continuous (high) so the bracket fires in one burst.
- Self-timer or remote: 2-second delay or a wired/wireless remote to avoid touching the shutter button. Shutter-press vibration is the #1 cause of “soft” HDR composites.
- Mirror lock-up: On, if shooting DSLR. Mirror slap blurs frames at slower shutter speeds.
Auto Exposure Bracketing (AEB)
Most modern bodies have AEB built in. Set the count (3, 5, or 7) and the EV step (1.0, 1.5, or 2.0). Fire one trigger; the camera handles the rest.
If your body only supports 3-shot AEB but the room needs 5, shoot one bracket at 0 EV center, then dial exposure compensation to -3 and shoot another 3-shot bracket. You end up with seven unique exposures (-5/-3/-1, 0, +1/+3/+5 — drop the duplicates).
Composition (Don’t Skip This)
- Shoot from corners. A two-point perspective from the corner makes rooms feel larger and shows the floor plan flow.
- Verticals straight. Use the in-camera level or a hot-shoe bubble. Tilted door frames are the #1 amateur tell.
- One light source per WB. If a room mixes daylight and tungsten, decide which one wins and turn the other off (or accept the color cast and fix it in post). Mixed sources kill HDR realism.
These on-site basics make the merge predictable. Skip them and post-processing becomes damage control instead of polish.
5 HDR Mistakes That Ruin Real Estate Photos
These five errors are responsible for most “bad HDR” listings. Each one has a fix that takes seconds on-site or in post.
Mistake 1: The Cartoon Look
Symptom: glowing halos around windows, oversaturated walls, fake-looking textures on wood and stone. Caused by pushing tone mapping sliders (Strength, Detail, Clarity) to maximum during the merge.
Fix: pull every HDR-specific slider back to 30-50% of the default. The goal is a photo that looks like the room, not a digital painting. If the result feels flat after dialing back, the issue is your bracket spacing — not the tone mapping.
Mistake 2: Ghosting from Movement
Symptom: blurry leaves outside a window, double-exposed ceiling fan blades, transparent figures of people who walked through the frame mid-bracket.
Fix: enable de-ghosting in your merge software (Lightroom calls it “Deghost: High”). For severe motion, designate one frame as the master for the affected zone — the software then uses only that single exposure for the moving area while still HDR-merging the rest.
Mistake 3: Misalignment from Camera Shake
Symptom: soft edges, ghosted text on signs, double lines on door frames. Caused by hand-pressing the shutter, a wobbly tripod, or wind through an open window.
Fix: use a 2-second self-timer or remote release. Lock all tripod knobs. Close windows during exteriors if wind is shaking the rig. Mirror lock-up on DSLR bodies.
Mistake 4: Mixed Light Sources Without Color Correction
Symptom: half the room looks orange, the other half looks blue. Common in kitchens with under-cabinet LEDs and daylight from a window, or in living rooms with tungsten lamps next to glass doors.
Fix: turn off as many artificial sources as possible during the shoot. If you can’t, fix it in post — mask the warm zones and shift them toward the cooler dominant temp (or vice versa). Don’t try to tone-map your way out of mixed WB; the color cast will survive every slider you touch.
Mistake 5: Wrong Bracket Spacing for the Scene
Symptom: even after merging, the windows still clip to white or the floor still crushes to black. You used a 3-shot bracket on a 5-shot scene.
Fix: chimp the histogram on-site after the first bracket. If the darkest frame still shows clipping warnings on the highlights, widen to a 5-shot at -4/-2/0/+2/+4. If the brightest frame still has clipping on the shadows, widen the low end. The bracket should bookend the scene’s full dynamic range — not just sample the middle.
HDR vs Flash vs Ambient: Which Workflow When
HDR is one of three main interior workflows. Each has trade-offs in time, gear cost, and final look. Most working real estate photographers pick one as their default and use the other two for edge cases.
| Attribute | HDR (bracketing) | Flash (flambient) | Ambient (single exposure) |
|---|---|---|---|
| On-site time / room | 2-3 minutes | 8-15 minutes | 30-60 seconds |
| Gear cost | Camera + tripod (~$1,200) — see our equipment kit guide | Camera + tripod + 2-3 flashes (~$2,500+) | Camera (~$800) |
| Skill ceiling | Intermediate | Advanced | Beginner |
| Post-processing | 5-10 min/photo (auto merge + tone map) | 20-45 min/photo (manual layer blending) | 2-5 min/photo (basic exposure tweaks) |
| Window detail | Excellent (captured by dark bracket) | Excellent (captured by ambient base) | Poor (clips to white in most rooms) |
| Color accuracy | Good (one light source dominant) | Excellent (flash neutralizes mixed WB) | Variable (depends on scene) |
| Motion handling | Poor (ghosting on moving subjects) | Excellent (flash freezes motion) | Excellent |
| Best for | Volume residential, Airbnb, mid-tier | Luxury, architectural, magazine work | Low-budget rentals, quick turnaround |
| Worst for | Windy exteriors, busy backgrounds | Solo photographers shooting 6+ homes/day | Anything with a bright window |
The decision usually comes down to volume. Shooting two homes a day at $250 each? HDR. Shooting one home a week at $1,500? Flash. Shooting your own short-term rental? Ambient is fine if the rooms are well-lit.
For a closer look at how lighting choices affect the final image, the tutorial on improving the lighting of any room covers complementary techniques (decluttering and lighting interact more than people think).
Post-Processing the Bracket
The on-site work is done. Now the bracket goes from a folder of RAW files to a single listing-ready JPEG. For the wider RAW → Lightroom → AI sequence this slots into, see our end-to-end guide on how to edit real estate photos.
Step 1: Merge
Pull the bracket into Lightroom Classic, Photomatix Pro, or Aurora HDR. Select all frames in the bracket, right-click, and choose Merge to HDR (Lightroom) or the equivalent in your tool. The output is a 32-bit DNG or HDR file holding all the dynamic range from every input frame.
Enable Auto-Align (corrects micro-shifts between frames) and Auto-Tone (applies a baseline tone map). For ghosting, Lightroom’s Deghost setting offers None / Low / Medium / High — start at Low and step up only if the merged image shows blur in moving areas.
Software comparison for the merge step:
| Tool | Strength | Weakness | Cost (2026) |
|---|---|---|---|
| Lightroom Classic | Tight integration with the rest of the edit. | Less aggressive tone mapping than rivals. | $11.99/mo |
| Photomatix Pro | Deepest tone-mapping controls. | Standalone — exports back to LR for finish. | $99 one-time |
| Aurora HDR | Best AI-assisted preset library. | Discontinued updates in 2024. | Last sale ~$99 |
| HDR Efex Pro (Nik) | Plugin into LR/Photoshop, fast preset workflow. | Steeper learning curve on local controls. | Bundled with Nik |
| Capture One | Better color science out of the gate. | HDR merge is newer, less mature. | $24/mo or $299 |
Step 2: Tone Mapping
The 32-bit merge has more tonal range than any monitor or print can display. Tone mapping compresses it to 8-bit while preserving the visible detail. This is where most HDR work goes wrong — the sliders are tempting and the dynamic range is real.
Settings that produce natural results:
- Highlights: -50 to -80 (recovers window detail).
- Shadows: +30 to +60 (opens dark corners without crushing mid-tones).
- Whites: -10 to +10 (small adjustments only).
- Blacks: -10 to 0 (preserves contrast in deep shadows).
- Clarity: +5 to +15 (subtle texture lift; anything more crosses into cartoon territory).
- Vibrance: +10 to +20.
- Saturation: 0. Use Vibrance instead — it protects skin tones and existing strong colors.
The best HDR editing in real estate is the kind nobody notices. The image should feel like the room, with the window readable and the floor visible. If a viewer thinks “wow, that’s HDR,” you went too far.
Step 3: Lens & Geometry Corrections
Apply lens profile corrections (Lightroom > Lens Corrections > Enable Profile). For wide-angle shots (16-24 mm), use the Transform panel to straighten verticals — Auto often works for symmetric rooms; use Guided for tricky angles.
Step 4: White Balance Cleanup
Even with manual WB on the body, mixed sources may need local correction. Use the Adjustment Brush to mask warm zones (lamps, under-cabinet LEDs) and shift them cooler, or vice versa.
Step 5: Final Polish
- Spot-remove sensor dust and minor blemishes.
- Crop to listing-friendly aspect (4:3 or 3:2 — MLS systems often resize and crop, so leave breathing room).
- Export to JPEG, sRGB, 2048 px on the long edge, quality 85.
A well-shot bracket should take 5-10 minutes per photo through this workflow. Faster is fine; slower means the bracket on-site wasn’t tight enough.
The AI HDR Shortcut
The full HDR workflow above takes 2-3 minutes per room on-site (capture + chimp) and 5-10 minutes per photo in post. For a 30-photo home, that’s 4-6 hours of work per listing. For a working real estate photographer shooting 5-15 homes a week, the math gets brutal fast.
AI lighting enhancement compresses both stages into seconds. BrightShot’s lighting enhancement AI takes a single RAW or JPEG, analyzes the dynamic range, and produces an output with HDR-style tonal balance — windows recovered, shadows opened, mid-tones preserved — without bracketing on-site or merging in post. For the broader picture of which tasks AI handles best across a listing, see our complete guide to AI real estate photo editing.
How it works:
- You shoot a single exposure (the metered shot, no bracket required).
- The AI runs a tone-mapping model trained on professionally edited real estate photos.
- The output is a balanced JPEG with the window detail and shadow detail you’d get from a 3-shot HDR merge.
Where it wins:
- Volume work. 30 photos per home, 10 homes a week = 300 photos. The AI processes that batch faster than Lightroom can render previews.
- Reshoots and missed brackets. When a frame in the bracket is corrupted or you shot single-exposure by accident, the AI rescues the file instead of forcing a re-visit.
- Phone-shot listings. Agents and short-term rental hosts shooting on iPhone or Android get HDR-quality output without buying a tripod.
Where traditional HDR still wins:
- Extreme dynamic range scenes (south-facing kitchens at noon with floor-to-ceiling glass) where even a 5-shot bracket struggles.
- Architectural and luxury work where the photographer needs pixel-level control and time isn’t the constraint.
For high-volume real estate photography HDR work, the AI shortcut is increasingly the default. The 4-6 hours per listing collapse to under an hour, and the output is consistent across the set — which matters more for buyer perception than any single hero shot.
Recent industry surveys back this up: 53% of real estate photographers now offer AI-enhanced lighting alongside traditional HDR services, and 70% use AI for adjacent edits like decluttering, sky replacement, and grass enhancement. The shift mirrors what happened to film photography — the manual workflow doesn’t disappear, but it stops being the default for volume work.
When to Run AI Over Manual HDR
| Scenario | Use traditional HDR | Use AI lighting |
|---|---|---|
| 30-photo listing, next-day turnaround | Yes | |
| Luxury listing, 3-day turnaround, $1,500+ shoot | Yes | |
| Single-exposure shots from a phone | Yes | |
| Twilight exteriors with extreme contrast | Yes (5+ shot bracket) | (as a finishing pass) |
| Bracket has motion ghosting in 2+ frames | Yes (single frame) | |
| Multi-property batch, 100+ photos | Yes | |
| Architectural portfolio shoot | Yes | |
| Client only sent you a JPEG, no RAW | Yes |
The two workflows aren’t mutually exclusive. Many photographers shoot a 3-shot HDR bracket for the hero shots in each room (kitchen, living, master) and run AI lighting on the supporting shots (closets, hallways, secondary bedrooms). That hybrid approach gets the volume math to work without sacrificing the cover image.
Pairing HDR With the Rest of the Listing
HDR fixes lighting; it doesn’t fix the room. Two adjacent workflows compound the result:
- Decluttering. A perfectly lit photo of a cluttered room is still a photo of a cluttered room. The guide on how to declutter your home for sale covers what to remove on-site (and what AI can remove in post).
- 360 tours. HDR stills set the first impression; an interactive tour holds attention. Our breakdown of the best 360 virtual tour software compares the platforms agents actually use.
Listings using HDR + decluttering + a tour link consistently outperform listings using any single technique alone. The marginal cost of all three has dropped sharply with AI tooling — there’s no good reason to ship a 2026 listing without them.
A typical 2026 listing-prep checklist for a $400k home:
- Shoot 25-35 single exposures (or HDR brackets if shooting traditional).
- Run AI lighting enhancement on the full set (or merge brackets manually).
- Decluttering pass — remove personal items, small appliances, clutter.
- Sky replacement on the exterior cover shot if the day was overcast.
- Twilight conversion on the exterior shot for evening MLS push.
- Stitch a 360 tour from 4-6 panorama positions.
- Export web-resolution JPEGs (2048 px long edge, sRGB, quality 85) for MLS.
- Export print-resolution TIFFs for any flyers or brochures.
Total time on a 30-photo home with the AI workflow: roughly 90 minutes start to finish. The same checklist with manual HDR + manual decluttering: 5-7 hours. That delta is why the AI shortcut has become the default for high-volume photographers and why solo agents shooting their own listings can now match the output of a $300/hr photographer.
What real estate photographers say (Reddit)
Across r/RealEstatePhotography and r/photography the most common 2026 debate isn’t HDR vs flash — it’s HDR vs AI lighting on the everyday $250 listing shoot. The economics are clear: a 7-shot bracket plus careful tone-mapping costs roughly 15 minutes of post-processing per room. AI lighting on a single ambient JPEG costs about 8 seconds.
Reddit user, r/RealEstatePhotography: “Still tripod-and-bracket for any hero shot, but I’m shooting single ambient JPEGs for the bedrooms and closets and running them through AI lighting. Clients can’t tell the difference and I’m home for dinner.”
The consensus position: keep HDR for hero shots and exteriors where the dynamic range is genuinely beyond what AI can reconstruct. Use AI lighting for the 70% of frames where you just need to lift shadows and tame a window. According to Adobe’s 2024 photography trends report AI photo enhancement tools were the fastest-growing photography category in the year, which tracks with the workflow shift this thread describes.
Editor’s note: If you want to skip the tripod entirely for non-hero shots, BrightShot’s lighting-enhancement mode takes a single ambient JPEG and recovers both window detail and shadow detail in one pass. It’s the AI step many photographers in the thread above describe replacing their secondary HDR brackets with.
Discuss this guide on r/RealEstatePhotography →
FAQ
Do I really need a tripod for HDR?
Yes. The merge requires that every frame is pixel-aligned. Even a 1 mm shift between brackets produces ghosting on edges and soft text. Hand-held HDR works for travel snapshots; for listing photography, a tripod is non-negotiable.
How many exposures should I take per scene?
3 shots (-2/0/+2 EV) handle most residential interiors. 5 shots (-4/-2/0/+2/+4) for high-contrast scenes — direct sun through wide windows, twilight exteriors, open-plan rooms with mixed light zones. 7 shots only for extreme cases (sunset with interior lights on).
What’s the best aperture for HDR interior shots?
f/8 to f/11. Wide enough to keep shutter speeds reasonable on the dark frame, narrow enough for deep depth of field across the room. Below f/8, the foreground sharpens at the cost of the background; above f/11, diffraction starts softening the whole frame.
Can I shoot HDR handheld?
Technically yes — most cameras have in-body alignment and de-ghosting in their HDR merge software. In practice, no. The output is consistently softer than tripod-based HDR, and any motion in the scene (curtain, fan, person) compounds the misalignment.
Should I use Auto White Balance for HDR brackets?
No. Auto WB shifts the color temperature between frames, which the merge software then averages — producing a muddy, off-color composite. Set white balance manually to the dominant light source and lock it.
How do I avoid the “cartoon” HDR look?
Pull every HDR-specific slider back to 30-50% of the default value. Highlights -50 to -80, Shadows +30 to +60, Clarity +5 to +15 max, Saturation at 0 (use Vibrance instead). The goal is invisible HDR — a photo that looks like the room felt.
When should I avoid HDR?
Three cases. First, scenes with constant motion (busy street outside a window, a beach with waves). Second, low-dynamic-range rooms (windowless basements, hallways) where a single exposure has all the data needed. Third, when you’re shooting volume on a tight deadline — that’s where AI lighting enhancement replaces HDR entirely.
Is HDR or flash better for real estate?
Depends on volume and budget. HDR for high-volume residential work where time is the constraint. Flash (flambient) for luxury and architectural shoots where pixel-level control matters more than turnaround. The comparison table above breaks down the trade-offs.
Can AI replace HDR bracketing?
For most residential work, yes. AI lighting enhancement produces HDR-style output from a single exposure in seconds. For extreme dynamic range scenes (direct sunlight through wide glass) traditional bracketing still has the edge — the AI can’t invent detail that wasn’t in the source frame.
Skip the bracketing, the merge, and the tone mapping. BrightShot takes a single photo and produces a balanced, listing-ready output with HDR-style range in seconds — 30 photos in the time a manual HDR workflow handles one. Try it free at bright-shot.com.


